「werkzeug」でWSGIアプリをつくろう!
あらかじめ必要なもの
- aptitude install python-setuptools # for ubunutu
- easy_install werkzeug
注釈
環境によってはsudoなどを用いて管理者権限に昇格する必要があります。 Windows版でのsetuptoolsのインストールについては http://python.matrix.jp/modules/setuptools.html などを参照してください。
WSGIってなんじゃらほい(おさらい)
WSGIはPython文化から生まれのHTTPサーバーインターフェース規格。 基本のサーバーを実現するのに一個の関数を決められた形で記述するだけという 超シンプルで素敵な規格なのです。 この規格を「WSGIアプリ規格」と呼びましょうか。 「WSGIアプリ規格」の最小のサンプルを以下に示します。
def application(env, start_response):
  start_response('200 OK', [('ContentType', 'text/plain')])
  return 'Hello WSGI world!'

from werkzeug import run_simple
run_simple('0.0.0.0', 8000, application)
実行すると:
* Running on http://0.0.0.0:8000/
ブラウザで、 http://localhost:8000/ にアクセスすると・・・。 ブラウザには「Hello WSGI world!」と表示されていますね?
実行端末には:
127.0.0.1 - - [21/Oct/2010 00:03:59] "GET / HTTP/1.1" 200 -
127.0.0.1 - - [21/Oct/2010 00:04:00] "GET /favicon.ico HTTP/1.1" 200 -
と出てきますが、 一行目にある「200」はURL「/」からプロトコル「HTTP/1.1」をつかって 正常にコンテンツを「GET」つまり引き落とせたことを示します。
ブラウザは伝統的に初めて訪れたページのアイコンイメージを取得しようとします。 うまくアイコンを取得出来れば、アドレスバーの左はじなどに表示したり、 ブックマークした時のアイコンに利用されます。 (ただし、このサンプルではアイコンとして成立しない内容を返しているので無視されます。)
「/」にアクセスした時にどんなやりとりがあったのかを見るのにはブラウザの chromeやsafariのインスペクタ機能やFirebugなどを使うとよくわかります。 この表示は「chromeのデベロッパーツール」によるものですが、
Request URL:http://localhost:8000/
Request Method:GET
Status Code:200 OK
>Request Headers
  Accept:application/xml,application/xhtml+xml,text/html;q=0.9,text/plain;q=0.8,image/png,*/*;q=0.5
  User-Agent:Mozilla/5.0 (X11; U; Linux i686; en-US) AppleWebKit/534.7 (KHTML, like Gecko) Chrome/7.0.517.41 Safari/534.7
>Response Headers
  Connection:close
  ContentType:text/plain
  Date:Wed, 20 Oct 2010 15:03:59 GMT
  Server:Werkzeug/0.6.2 Python/2.6.6
ここでの「Status Code: 200 OK」と「ContentType:text/plain」がサンプルの中に記述したものが そのまま現れています。隣のタブにはResponseコンテンツがありそこを見れば 「Hello WSGI world!」とあります。これもサンプルコードに記述したものが現れています。 HTTPサーバーの最小の役割とは「Status Code」、「ContentType」、「コンテンツ」の3つをResponseの形にして返信すること。
その返信の記述が以下の2行に集約されています。
start_response('200 OK', [('ContentType', 'text/plain')])
return 'Hello WSGI world!'
WSGIアプリでHTMLドキュメントを返信したければ、
start_response('200 OK', [('ContentType', 'text/html')])
return '<p>Hello WSGI world!</p>'
というようにすればいいだけです。
非常にシンプルですね!
シンプルすぎたら大きなアプリは書けないんじゃ?と思うかもしれませんが、 「WSGIミドルウェア規格」という仕掛けも決められています。
「WSGIミドルウェア規格」では入力に「WSGIアプリ」、 返値に「WSGIアプリ」という取り決めになっているだけです。
「Requestをに応じてアプリを切り替える」ようなミドルウェアを実現したり、 「アプリが出力した結果を加工して返す」ようなミドルウェアを実現しようとするとき
ただ単に以下のような関数を書くだけです。
def middleware(application):
    def func(env, start_response):
        # TODO: env <= pre processing.
        res = application(env, start_response)
        # TODO: res <= post processing.
        return res
    return func
このmiddleware関数「関数オブジェクト」を引数に渡して「関数オブジェクト」を返していて、 このmiddleware関数に通す前と後とで呼び出しの引数の数と型、返すものの型が変化していないので、 利用方法に変化はありません。っていうか利用方法に変化がないように記述するのが「WSGIミドルウェア規格」。
この仕掛けをうまく使えば、Webアプリ全体に機能追加することが容易になります。 例えば・・・。
def lower_middleware(application):
  def func(env, start_response):
    res = application(env, start_response)
    return res.lower()
  return func

def application(env, start_response):
  start_response('200 OK', [('ContentType', 'text/plain')])
  return 'Hello WSGI world!'

application = lower_middleware(application)

from werkzeug import run_simple
run_simple('0.0.0.0', 8000, application)
「hello wsgi world!」って表示されますね?これは小文字化するミドルウェアのサンプルです。
pythonのデコレータ記述を使って書くと以下のように書けます。
def lower_middleware(application):
  def func(env, start_response):
    res = application(env, start_response)
    return res.lower()
  return func

@lower_middleware
def application(env, start_response):
  start_response('200 OK', [('ContentType', 'text/plain')])
  return 'Hello WSGI world!'

from werkzeug import run_simple
run_simple('0.0.0.0', 8000, application)
つまり、ミドルウェアを書くのはちょっと慣れが必要だけど、 ミドルウェアを記述したモジュールを利用するのは非常に簡単!ということ。
werkzeugってどんなの?
数あるWSGI準拠サーバー群の中でもできるだけWSGIのシンプルさを 損なわずにWSGIの不便さをカバーしてくれているツールセット。
フレームワークと呼べるほどいろんな機能が連携する部分は提供されていませんが、 特徴を挙げていくと・・・
- Requestオブジェクトの支援ツール
- Responseオブジェクトの支援ツール
- Responseオブジェクト自体がWSGIアプリ
- 例外オブジェクトもWSGIアプリ
- 超絶かっこいいデバッガーが付いてる
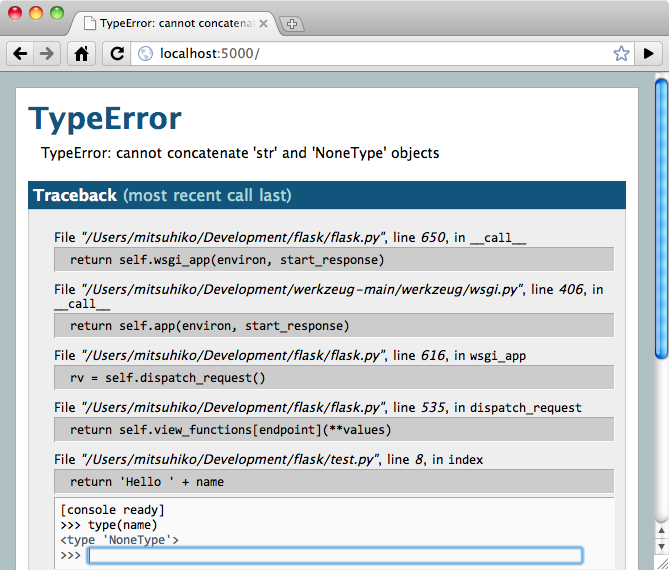
超絶かっこいいデバッガーの図
werkzeugにおけるURLルーティング
「werkzeug.routing.Map」クラスはURLパーサーです。 コンストラクタに「対応付けルール」のリストを渡します。
from werkzeug.routing import Map, Rule, RequestRedirect

url_map = Map([
  Rule('/index', endpoint='index.html'),
  Rule('/page_list', endpoint='page_list.html'),
  Rule('/status', endpoint='status.html'),
])
endpointの意味は利用者が自由に決めてもいいようになっており、 本家ドキュメントのQuickStartなどでは上記のようにテンプレート名を設定して置き、 アプリの実装ではテンプレートエンジンのレンダラを呼び出す時に参照しています。
私は、endpointにWSGIアプリ(関数オブジェクト)を指定する使い方が最近お気に入りです。
スタティックコンテンツのサーブ
スタティックコンテンツをサーブするだけなら以下のように書けます!
from werkzeug import SharedDataMiddleware
from werkzeug.exceptions import NotFound
from werkzeug import run_simple

application = SharedDataMiddleware(NotFound, {'/': 'output'})

run_simple('0.0.0.0', 8080, application)
URLの書き換え
以下のサンプルではURLがスラッシュ「/」で終わっている場合に index.htmlを付け足すというURLの書き換えを行ないます。 (リダイレクトではないのでブラウザのアドレス表示はそのまま)
from werkzeug import SharedDataMiddleware
from werkzeug.exceptions import NotFound
from werkzeug import run_simple

class RenameMiddleware(object):
  def __init__(self, application, pattern, substitute):
    self.application = application
    self.pattern = re.compile(pattern)
    self.substitute = substitute
  def __call__(self, environ, start_response):
    environ['PATH_INFO'] = self.pattern.sub(self.substitute, environ['PATH_INFO'])
    return self.application(environ, start_response)

application = SharedDataMiddleware(NotFound, {'/': 'output'})
application = RenameMiddleware(application, r'(.*)/$', r'\1/index.html')

run_simple('0.0.0.0', 8080, application)
注釈
この様にミドルウェアはクラスで記述したほうが効率が良くわかり易いことが多いです。
細かくURLとアプリを対応付ける場合
from werkzeug import run_simple

@Request.application
def get_resource(request):
  id = request.environ['values'].get('id', 0)
  return Response('get:'+str(id))

@Request.application
def post_resource(request):
  id = request.environ['values'].get('id', 0)
  return Response('new:'+str(id))

@Request.application
def delete_resource(request):
  id = request.environ['values'].get('id', 0)
  return Response('del:'+str(id))

@Request.application
def put_resource(request):
  id = request.environ['values'].get('id', 0)
  return Response('update:'+str(id))

url_map = Map([
  Rule('/resource/<int:id>', endpoint=get_resource, methods=['get']),
  Rule('/resource/<int:id>', endpoint=post_resource, methods=['post']),
  Rule('/resource/<int:id>', endpoint=delete_resource, methods=['delete']),
  Rule('/resource/<int:id>', endpoint=put_resource, methods=['put']),
])

@Request.application
def application(request):
  adapter = url_map.bind_to_environ(request.environ)
  endpoint, values = adapter.match()
  request.environ['values'] = values
  return endpoint

run_simple('0.0.0.0', 8080, application)
まとめ
werkzeugは噛めば噛むほど良さがにじみ出る良いWSGIツールセットです。 みんなどんどんwerkzeugを使いましょう!